The content of the article
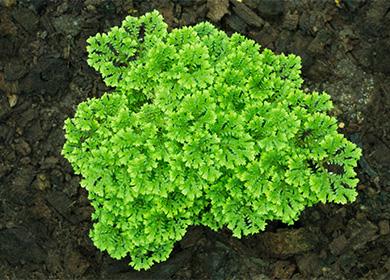
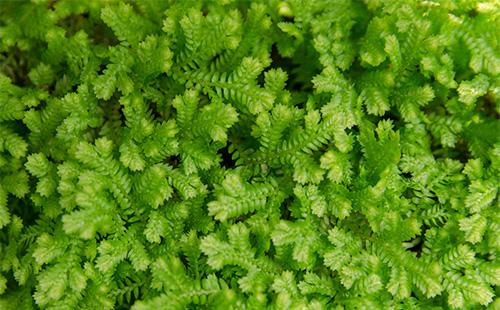
Jericho rose, plauchnik - the emigrant from the tropics and subtropics of America, Mexico and Africa is also called. In the natural environment, a spore herbaceous plant extends up to 20 m, and when grown indoors, up to 25-30 cm. Selaginella has creeping shoots with aerial roots that are easily fixed in the ground. Some species resemble species of mosses or ferns. Thin carved leaves resemble small needles. They also come in round, spiral and even tile shapes, glossy or matte textures, from light to saturated green, sometimes with a yellow or silver pattern.
Types of indoor plunge
Under natural conditions, there are several hundred species of the family of the plaunidae, but growing selaginella at home - greenhouses or rooms - is suitable only for a couple of dozen. Of these, botanists have identified several of the most unpretentious species that will feel most comfortable in living quarters.
- Scaly. This species tolerates drought very well. On sale often presented in the form of a ball with a diameter of about 10 cm, consisting of dried gray-brown leaves. If you place such a herbarium in a container of water, the selaginella “comes to life” within a day and restores its bright green color. At a rosette plant, shoots grow up to 15 cm, dense and hard leaves resemble a carved feather in shape with small scaly leaves, on top of which there are pores for water absorption. Scientists noted that the scaly appearance of selaginella is able to do without moisture for several decades, and after moisturizing to recover again. Therefore, the flag is often called the "resurrecting plant."
- Swiss It differs from other varieties in a lighter color and thick carved leaves growing perpendicular to the stem and creating an accurate geographical pattern. Small pointed leaves of the lower row grow to 1 mm, the upper - do not exceed 2 mm. Creeping stems of grassy perennials reach 10 cm in length.
- Vildenova. The nature of the branching of a bushy plant resembles coniferous branches. In the rooms, this type of selaginella is grown in hanging flowerpots or pots. On flat branched shoots there are small openwork leaflets of a bluish-green color, sometimes with a blue tint. The length of the stems does not exceed 10-12 cm.
- Martens. The most popular plant species among gardeners. Shoots grow continuously throughout the year, reaching 30 cm. Branches abundantly. Outwardly, twigs are similar to fern fronds, at the ends of which small spores form. Growing fast, selaginella creates the effect of a green openwork carpet. One of the decorative varieties - Martens Watsoniana - is characterized by whitish-silver tips at the leaves.
- Legless. Perennial is cultivated in the home environment as a groundcover or ampelous species.Creeping short stems no more than 20 cm long have additional roots and thin leaves of pale green color. Lateral leaves are oval, closer to the base - heart-shaped, serrated along the edge. A fairly sought-after species of the family of lapids, since it is quite simple to take care of selaginella without a legless, and the decorativeness of the plant will advantageously complement any interior solution.
Selaginella: care for active growth
To provide the plunok with an adequate level of humidity and protection from pests, experts recommend growing the plant in glass florariums, paludariums or window greenhouses. The potted version is also suitable for decorating a flower garden, or as a separately growing ampel.
Lighting and microclimate
Selaginella perfectly feels in partial shade. It is also growing steadily in artificial lighting. Avoid direct sunlight on the flower and protect it from drafts. The plant will comfortably take root on window sills on the north side or shaded western and eastern windows.
In any season of the year, a tropical guest needs a constant temperature. The optimal level is 18-21 ° C. To avoid plant diseases, the room temperature should not be lower than 12 ° C and above 25 ° C.
Watering and watering
Caring for the selaginella in summer requires abundant watering, in winter you should also constantly keep the soil moist and prevent drying out. It is necessary to water selaginella with warm, standing water.
The main requirement is to maintain at least 50-60% humidity near the flower. An insufficient amount can lead to drying out and death of the tips of the leaves on the stem. For prophylaxis, selaginella should be sprayed with warm water daily. In addition, a pallet with moistened porous material, such as expanded clay, can be installed under a flower pot.
Feeding the plucker is carried out in the warm season - from April to October, twice a month. For the procedure, you can take liquid top dressing for decorative and leafy varieties. The dose indicated on the package should be halved. Judging by the reviews of gardeners, selaginella will also like fertilizer for orchids.
How much and how often to water the plant, the required level of temperature and humidity relative to seasonality, are set out in the table.
Table - Comfortable conditions for selaginella and proper watering
| Season | Temperature ° C | Watering frequency | Humidity% | Spraying |
|---|---|---|---|---|
| Summer | 20-24 | - 1 time in 2 days | 60-70 | - 2-3 times a day |
| Winter | 15-21 | - 2 times per week | 50-60 | - 1 per day |
| Off-season | 18-21 | - 2-3 times a week | - 1-2 times a day |
Transplant Rules
Plant transplantation is recommended to be carried out traditionally in the spring no more than once every couple of years. Or, in the case of rapid growth, by transshipment, without violating the integrity of the earthen coma. Given the superficial root system, the pot should be selected shallow but wide. Soil should be as moisture-resistant and loose. To prepare the soil mixture, it is enough to combine peat, sand, sheet and soddy earth in equal parts. The process of transplanting selaginella is carried out in seven stages.
- A day before the transplant, water the plant so that the earthen lump does not crumble and the roots are not damaged.
- Pour a drainage layer of 2 cm at the bottom of the pot.
- Lay a layer of prepared soil on top of the drainage, covering three quarters of the container.
- Carefully remove the plant from the old pot, inspect the root system for diseases or damage.
- Place in a new flower pot.
- Fill the voids with the soil mixture and slightly compact.
- Pour transplanted selaginella with settled room water.
Breeding options
In the natural environment, varieties of the family of the plunin breed propagate by their own spores. Professionals argue that planting selaginella with spores at home is inefficient and troublesome. Propagating selaginella is easier to vegetatively: by dividing the bush or rooting the stem cuttings.
- Division of the bush. This method is used when transplanting a plant. Care must be taken to separate parts of the order of 5 cm from the root system along with the shoots. Seed the parts in a container with wet peat soil, three to five pieces each. After the procedure, the seedlings should be covered with glass or a transparent film and within seven to ten days to provide the plant with increased humidity.
- Rooting shoots. Stalk cuttings also take root easily. It is necessary to choose parts of shoots with a length of at least 3-4 cm, having additional roots. Cut the cut stems slightly into the soil mixture and cover with a translucent film. For one to two weeks daily spray the plant with warm water.
Possible problems
All types of plunks are quite resistant to diseases, however, in case of violation of the conditions of home detention, sometimes difficulties arise. For example, too high a temperature causes the selaginella to darken and fall off the leaves. The table sets out the most common plant diseases and their causes. The only treatment for the diseases listed below is proper plant care.
Table - Symptoms and causes of selaginella diseases
| Problem | Cause |
|---|---|
| Blanching foliage | - direct sunlight |
| Leaves twist | - Drafts; - high air temperature |
| Darkening and leaf fall | - High air temperature |
| Stretching shoots | - insufficient lighting |
| Leaf wilt | - Lack of air at the roots; - soil overflow |
| Slow growth | - Lack of nutrients in the soil |
| Leaf tips dry | - Dry air |
Since it is not difficult to take care of selaginella in a pot, it will look great both as a single plant and in combination with other hygrophilous specimens. Using the slider as a "living carpet", one must take into account the fact that it does not get along with light-loving and drought-resistant representatives of the flora.
